Page 2 of 4
Re: P2 brake balance assembly
Posted: Wed Jul 22, 2020 8:05 am
by luli
Here are some more picture of the balance and the way it is assembled. I added two washers to explain were to have them if necessary. Remember that brakes are basic safety device and must be properly set. I suggest you find a co-operative garage and work with them according to the workshop manual. They have the required ramp or pit.
https://lulisml.files.wordpress.com/201 ... jpg?w=1300
https://lulisml.files.wordpress.com/201 ... jpg?w=1300
https://lulisml.files.wordpress.com/201 ... jpg?w=1300
Re: P2 brake balance assembly
Posted: Wed Jul 22, 2020 9:57 am
by RobHomewood
Hi Luli
Unfortunately I don't have a hoist or a pit and my garage floor slopes! So I am a bit scuppered there.
My lower lever from the long forward/back rod is single rather than twin like yours but perhaps you would know whether the arm of the lever is meant to be pointing forward or back from a line parallel to the axle (at rest)?
Hi Tony
I have not tackled any adjustment of the brakes whilst I have had the car and the brakes have worked reasonably, not that I have anything to compare them with. I just thought that as there was so much play in the overall setup I could improve the performance by taking up slack where I could. It may be that the wear in the linkages means I need to start replacing them anyway.
I am still wondering whether if I shortened the long rod this would both hold the piston in place more firmly and also take up some of the operating slack. I cant see that altering the balance between left and right brakes and the front/ rear compensator should ....well..... compensate? It might also help the handbrake which doesn't hold well on a hill.
regards
Rob
Re: P2 brake balance assembly
Posted: Wed Jul 22, 2020 3:40 pm
by luli
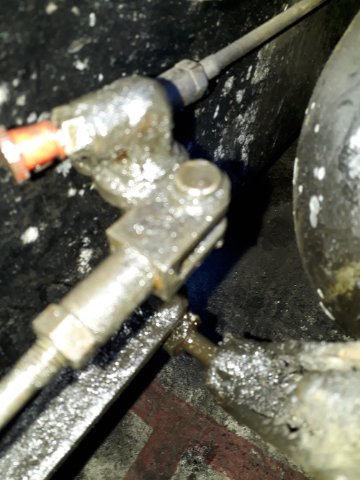
Look again at the following picture: It shows clearly that the part that connects to the main rod is turned backward. Always remember that the wheel rods are pulling the pistons of the expanders . When that lever is pointing backwards the moment increases as the rod is pulled, which is exactly what is required.
https://lulisml.files.wordpress.com/201 ... jpg?w=1300
Re: P2 brake balance assembly
Posted: Wed Jul 22, 2020 4:22 pm
by GOY189
RobHomewood wrote: ↑Mon Jul 20, 2020 11:11 pm
Thanks Luli and Mike
Mike: is it mainly the pin which wears or the fork or both equally? There is quite a lot of movement in the joints but not necessarily affecting the operational direction. And do you know the thread details etc for replacment forks? The parts book seems to say 5/16" for the fork ends and 5/16" for the pins but doesn't give the thread type and size onto the rod.
Luli: I am going around again checking the expander plates and the first one looked OK - well lubed and quite clean sliding faces. I had forgotten what a pain it is getting the shoes back on and ran out of time and energy after one wheel!
Rob
Rob, the dowels often end up with a step worn into them and the eye of the brakerods also wears. It can be brazed up and redrilled (not welded as that causes embrittlement) or drilled and sleeved back to dowel size. As the eyes are in the slot in the expander, a dab of loctite between the sleeve and the rod's eye keeps the sleeve in place.
Mike
Re: P2 brake balance assembly
Posted: Thu Jul 23, 2020 7:10 am
by TonyG
Rob,
Adjusting the main rods won't affect side to side balance. It's clear you have an issue with the rear if the handbrake isn't good and the rear balancer should sit closely in its axel location and not rest against the tank. So shortening the main rod to the rear sounds like a logical first step. Make sure that the rod is only adjusted to take out the excess movement of the rear balancer where it sits in the axel and isn't shortened to the extent that the rear swivel is applying tension on the rear brakes.
Let us know how you get on.
Tony.
Re: P2 brake balance assembly
Posted: Thu Jul 23, 2020 9:27 am
by TonyG
Re: P2 brake balance assembly
Posted: Thu Jul 23, 2020 12:55 pm
by RobHomewood
Hi Tony, Luli Mike
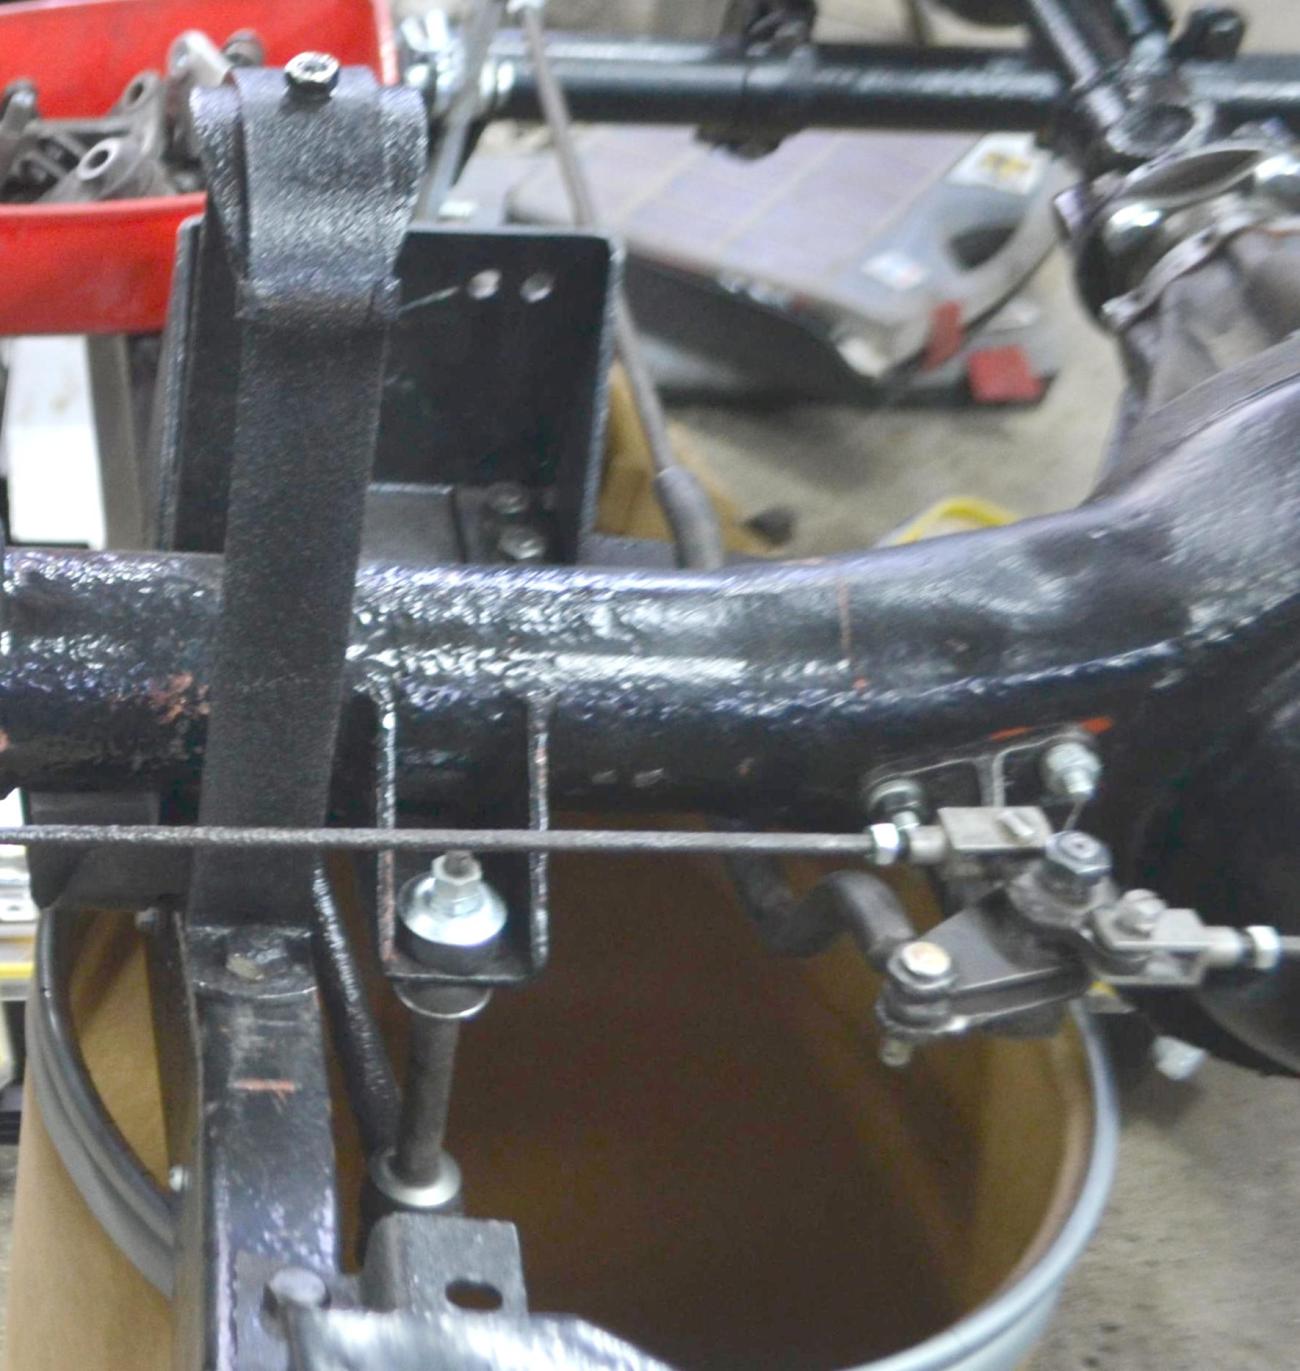
Thanks for the photos Tony- good of you to post them up. And congratulations on how clean it is underneath! Mine is pretty oily and mucky.
I'm having an 'off' day today but looking at the manual again I've found the part where it says the end of the bottom lever to the rear compensator should be 3/4" back from parallel to the axle and 1/2" clear of the fuel tank. This is as Luli said perviously.
Now, mine is roughly parallel to the axle so I would need to
lengthen the long rod to meet those criteria not shorten it. This may put the other settings out forward of the rear axle so I want to consider this some more. Again I may need a garage to help with this as Luli suggests. My knowledge is growing but is found wanting every time a new subject comes up and finding a mechanic/garage locally with suitable in depth experience isn't easy. I know an engineer who would probably be able to rebush the brake rod ends (as Mike suggests) but he hasn't got garage facilities to help with the setting up.
(You can just make out the long lever below the offside balance rod in the slightly poor picture which was taken through the wheel arch looking slightly down and back to the compensator. You can hopefully also see the somewhat gungy piston partly out of the bore near the centre of the pic )
Re: P2 brake balance assembly
Posted: Thu Jul 23, 2020 5:05 pm
by luli
Hi Rob,
Lengthening the main rod, followed by shorting the wheel rods seems to me as the right move.
Re: P2 brake balance assembly
Posted: Tue Aug 04, 2020 11:40 am
by RobHomewood
Hi again
I have been trying to adjust the brake rods as per the handbook instructions but am somewhat handicapped by the fact that I havent got a ramp or pit and space is limited underneath! I have adjusted compensator no 2 and the 2 relays to the spec but am struggling with compensator No 3/ the swinging link at the base of the foot pedal. The primary problem is that I dont understand what the compression tube function should be. It appears to me to negate the pressure you put on the pedal by allowing the tube to travel before any movement is put on the rear brakes. You seem to end up with the using the front brakes only.
I reconnected the handbrake and this now appears to be about 0% efficient. Can you adjust the position of the handbrake lever arm on the crosstube and if so how? Mine points forward from the tube but the service bulletin and parts list illustrations seems to indicate it pointing to the rear of the crosstube. Which is correct? (Different on the 10 and 12 models)
I am beginning to wish I had never started on the brakes!
Rob
Re: P2 brake balance assembly
Posted: Tue Aug 04, 2020 2:35 pm
by luli
The purpose of the compression tube is to allow the handbrake to function as an emergency brake. The whole idea of the Girling system is to be a differential system, meaning all shoes get the same pressure. and the compensators take care of that. Now suppose that a pin of the front brakes is lost, or a rod brakes (both had happened to me) - the foot brake won't work but the hand brake will!
So lower the handbrake lever and adjust the rods ignoring the hand brake until you get good braking . Only then adjust the hand brake lever. And yes, without a ramp or a pit this is very difficult and time consuming.